Sharity 3 Manual

Copyright © 2004 - 2007 by OBJECTIVE DEVELOPMENT Software GmbH
http://www.obdev.at/
gzcat PACKAGE.tar.gz | tar xf -
./setupIt is important that you run this script from the current directory.
sharity license license-keyor through the GUI application "sharitygui".
If you have gone through these steps and no errors occurred, Sharity 3 is installed on your system. You should now start the Sharity GUI in an X session. Sharity will use the GUI to ask for passwords when required. The Sharity GUI is installed in the binaries directory and has the name "sharitygui".
Once the GUI is running, you can start browsing your network at the browse directory. By default, this is at /CIFS.
A copy of the "uninstall" script is also available at Sharity's installation directory. If you use this instance of the script, make a backup copy before you run it because it will destroy itself (it is part of the installation, after all).
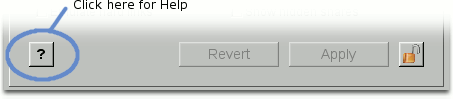
All install time configurations (except the installation file system paths) can be changed in the Sharity GUI, section "Options". For more information about the various configuration options please click the Help Button (the button with the question mark) to open the Help Window.
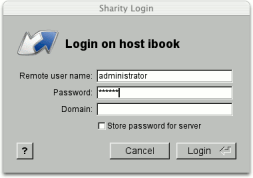 In order to access files, you must prove your identity to the computer which serves the files. This is called "authentication" and usually implemented by providing a user name and password (the credentials). If you run the GUI application, you don't need to log in to servers or shares explicitly. Sharity will automatically pop up a window asking you for credentials when required. These credentials will be remembered (in volatile storage - the logins will be lost during a restart) for future requests. To store your credentials permanently, use the Keychain explained below.
The GUI section "Logins" lists all servers and shares for which you currently have credentials. Clicking the "Logout" button will destroy your in-memory representation of the credentials so that Sharity has to ask again when it needs a resource from the server or share.
Kerberos can perform its magic only if your system is built and configured to use it. When you log in to your computer, it must use your name and password to obtain a "Kerberos Ticket" from a central trusted authority, the Key Distribution Center (KDC). This initial ticket, the "Ticket Granting Ticket", is equivalent to your credentials and is available to all applications you run (contrary to your password, which will never be disclosed to any of your programs).
If your system is configured to use Kerberos and you already have a Ticket Granting Ticket which can be used to log in to a server, Sharity will not ask you for credentials. Instead it will use the Kerberos mechanisms, obtain all required Kerberos tickets and log in to the server. You will notice the Kerberos login in the Sharity GUI, section "Logins", by the word "Kerberos" in the "Authentication" column.
Kerberos is a rather complex system and it must be configured correctly in order to work. Please ask your system administrator for how to bind your computer into the Kerberos domain. More information about Kerberos and a good link collection can be found at Wikipedia.
If you want Kerberos for authentication and also integrate the Unix machines entirely into the Windows domain, consider Centrify's DirectControl. This is an easy to install and easy to manage software package including Kerberos.
To add credentials to the keychain, first log in as usual. The credentials will be listed in the "Logins" section of the GUI. Then click the "Add to Keychain" button to add the password and user name to the keychain. Sharity will automatically switch to the "Keychain" section to show the stored credentials (keys).
The newly stored credentials will only be used for the server or share for which they have been stored. This is indicated by the URL displayed for the key. By choosing appropriate functions from the "Actions" popup, you can make a key default for the domain or workgroup or allow other users to read it. Credentials for servers are listed as "smb://servername" while default credentials for a domain are listed in capital letters as "smb://DOMAINNAME".
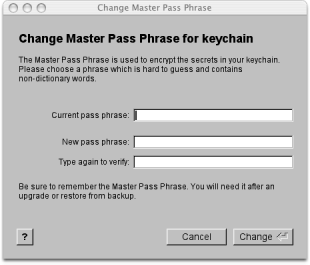 Information in the keychain is stored encrypted in a file on your computer's hard disk. You have been asked to provide an encryption password during installation which is used for this purpose. The encryption password can be changed at any time using the action "Set master pass phrase for key chain..." in the GUI or with the shell command "sharity keychain setpass".
In order to allow unattended operation, Sharity also stores your encryption password (the master pass phrase) encrypted in the file. It cannot use the master pass phrase itself for this encryption for obvious reasons. Instead, a machine password is built from machine specific information. As long as the machine specific data does not change, Sharity can use the keychain without user interaction. However, after an upgrade of Sharity or after a restore from a backup, it may be necessary to re-enter the master pass phrase to recover the keychain.
The /CIFS directory has the same purpose as the "Network Neighborhood" in Windows. After startup, it has two subdirectories: "entire_network" and "active_directory" (the latter is only available with the Sharity Kerberos module installed). Listing the directory "entire_network" lists all Netbios domains and workgroups known by computers in your local network segment. Going deeper into the hierarchy, the domain/workgroup directories list all servers known for that domain or workgroup. And finally, listing a server directory shows all shares of that server. The shares are represented by symbolic links which point to a place where the share is automatically mounted when accessed. Example:
    # ls -l /CIFS/
    total 0
    dr-xr-xr-x  2 root  root  16  2 Jun 22:48 active_directory
    dr-xr-xr-x  3 root  root  24  2 Jun 22:48 entire_network

    # ls -l /CIFS/entire_network/
    total 0
    dr-xr-xr-x  4 root  root  32  2 Jun 22:50 workgroup

    # ls -l /CIFS/entire_network/workgroup/
    total 0
    dr-xr-xr-x  2 root  root  16  2 Jun 22:51 ibook
    dr-xr-xr-x  7 root  root  56  2 Jun 22:51 server

    # ls -l /CIFS/entire_network/workgroup/server/
    total 6
    lrwxrwxrwt  1 root  root  1024  2 Jun 22:52 docs -> /CIFS/docs[server]
    lrwxrwxrwt  1 root  root  1024  2 Jun 22:52 ftp -> /CIFS/ftp[server]
    lrwxrwxrwt  1 root  root  1024  2 Jun 22:52 web -> /CIFS/web[server]
The "active_directory" entry in /CIFS will only be populated if your computer is configured to use Kerberos in a Windows 2000 domain. In this case it will list the domains known by the domain controller. Simply list the domain to see what is inside...
Browsing of domains and servers is based on Netbios broadcasts. These mechanisms may fail if there are no computers with the required knowledge in your network segment to answer the broadcast or if Netbios has been disabled by your administrator. In this case you can resort to the "active_directory" browser or manually configure the resources you want. Manual configuration is done in the GUI section "Resources". Click the Help Button in this section for more information about adding resources.
ls -l /CIFS/docs\[server\]/(Note: You may have to escape the square brackets from your shell as in the example above.) This command mounts the share \\server\docs (Windows notation) at /CIFS/docs[server] and lists its contents. From now on, docs[server] will be listed as a directory in /CIFS. In other words, automounted shares are listed in /CIFS as well. This is also the mechanism how the resource browsers in "entire_network" and "active_directory" automount shares.
Instead of mounting a share in the file system, you can utilize the automounter. For instance, if you want to have \\server\docs available in your home directory under the name "myserver" simply make a symbolic link:
ln -s /CIFS/docs\[server\] ~/myserverAll mounts and automounts are listed in the GUI section "Mounts". To remove any mount or automount, just click the "Unmount" button while the mount is selected in the list.
Most GUI actions have analogous shell commands. See the command "sharity -h" for a list of available commands. For more information about a particular command, type "sharity command -h" or "sharity man command".
Some common examples:
To log in to a particular server:
sharity login smb://myserverTo store your login at server "myserver" in the keychain:
sharity login -s smb://myserverTo list the contents of your keychain:
sharity keychainTo remove a particular password from the keychain:
sharity keychain delete smb://myserverTo change your master pass phrase:
sharity keychain setpass
However, if you really need to establish a low level mount of a share on a particular directory, it can be done like this (e.g.):
sharity mount smb://server/docs /mountpointThe directory /mountpoint must exist when the mount command is executed and it must be owned by the user who performs the mount. For more information about the sharity mount subcommand type sharity man mount.
Mounts established in this way are not permanent: They are gone after the next reboot or restart of Sharity. If you want to make a mount permanent, the sharity mount command must be run during system boot. Sharity provides a mechanism for that: The contents of the file /usr/local/sharity3/var/fstab are passed to sharity mount line by line when Sharity starts up.
To read the ACL for a file or directory use the command
sharity acl get pathTo add an entry to an ACL use (e.g.):
sharity acl add allow friend@domain.com "Read data" file.txt
 For more information about ACL manipulation, please see the output of the command "sharity acl -h" or "sharity man acl".
Manipulation of ACLs in human readable form (instead of security identifiers) requires the Sharity Kerberos module.
By default, Unix file attributes are not related to Windows ACLs. They are computed from the file's DOS flags such as "System" or "Write Protected". File owner and group are always copied from the current user.
If a service for translation of Windows Security IDs (SIDs) to Unix user and group IDs is available (such as e.g. Centrify's DirectControl), Sharity can compute Unix file attributes from Windows ACLs. See the option "Convert Windows ACLs" in Sharity's Options dialog.
ping 192.168.1.55If ping works, IP connectivity is established. If not, right-click the "Network Neighborhood" on the Windows desktop, choose "Properties", double-click your network interface adapter and click the "Properties" button. You will now see a window with various services and protocols. One of them is TCP/IP networking. Browse the properties of TCP/IP to see whether everything looks OK. Use the Windows help where appropriate. Note that you need to be an administrator in order to change any settings!
Once you have ping and thus basic IP networking running, check TCP. This is best done from the Unix command line with "telnet". With the example IP address from above that would be:
telnet 192.168.1.55 139This command tries to establish a connection to TCP port 139. There are three possible results:
(1) The port can be reached and everything works as expected:
$ telnet 192.168.1.55 139Everything is OK and you can quit the session by typing the escape character and then "q".
Trying 192.168.1.55...
Connected to 192.168.1.55.
Escape character is '^]'.
(2) The port is not "listening":
$ telnet 192.168.1.55 139In this case the server service is probably not started on the Windows side or the server has Netbios over TCP disabled. Go to the list of services and protocols as described above, but instead of inspecting TCP/IP, have a look at "File and Print Services for Microsoft Networks". Check that they are installed and active.
Trying 192.168.1.55...
telnet: connect to address 192.168.1.55: Connection refused
telnet: Unable to connect to remote host
(3) The port is not reachable:
$ telnet 192.168.1.55 139Then it hangs waiting for a reply. After a couple of minutes it prints:
Trying 192.168.1.55...
telnet: connect to address 192.168.1.55: Operation timed outIn this case a firewall is probably blocking the connection. Please make sure to allow access to TCP ports 139 and 445 and UDP ports 137 and 138 in your Windows firewall.
telnet: Unable to connect to remote host
If the server does not allow Netbios over TCP, Sharity can still connect. Please repeat the steps above with port number 445 instead of 139 to verify that the CIFS port is "open".
It will help you to know that SMB/CIFS has two modes of operation: User Level security and Share Level security. In user level security, users authenticate to the server and then have access to all shares available on the server. Each user has a separate private password. In share level security, each share has a separate password and everybody who knows this share password is granted access. It's the same password for all users and no user name is required. Windows 95, 98 and ME are primarily built for share level security. The server operating systems (NT, 2000 Server and 2003 Server) as well as Windows 2000 Professional and XP Professional all prefer user level security. XP Home Edition uses a kind of faked user level security: It asks for a user name and password, but accepts login only if an empty password is provided.
Since you want to access the Windows computer by name, there must be a service which maps the name to the appropriate IP address. Windows traditionally used Netbios Name service for this purpose. With Windows 2000, Microsoft has migrated to DNS (Domain Name Service), though. Netbios is usually still supported. If your network uses DNS, you can verify name resolution with ping or telnet. Using the computer name instead of the IP address should work. If you rely on Netbios, there is no standard utility available for testing, you need a special tool like "nmblookup" which is part of the Samba distribution. If your network uses a WINS server, make sure that the WINS setting is the same in Sharity and on the PC.
If the name service works, accessing a share through /CIFS/share[computer] should work. Browsing the network in the "entire_network" directory requires an other service: the Local Master Browse server (LMB). This service is elected dynamically among all Windows computers and other computers running an SMB server (such as e.g. Samba servers). The LMB service is usually enabled on computers where file and printer sharing is enabled. As a last resort, you can install Samba on your own Unix computer to ensure that there is an LMB. The easiest way to circumvent browsing problems, however, is to enter the resources manually in the Sharity GUI.
Hint: The help button works in all sections of the GUI and shows a section specific help.
There is a much more elegant solution. Use the automounter in /CIFS with a symbolic link. Say you want to have the share smb://server/share permanently available at the path /myshare, create a symbolic link like this:
ln -s /CIFS/share\[server\] /myshare(Note that the square brackets must be escaped from the shell.) When a user comes to /myshare, the share is automatically mounted and the Sharity GUI brings up a password dialog (unless the user is already logged in or has a password stored).
Let's assume that you need to access a couple of servers and have the same password on all of them. You want to store the password in a way so that it is tried first for each login in your domain or workgroup. This can be arranged in the following way:
Hint: All this can be done from the command line as well. Here is an example:
sharity login -s smb://serverSee "sharity man login" and "sharity man keychain" for details.
sharity keychain default smb://server
You can make all users go through the same account on the server. This is accomplished by storing the login in the keychain and then allow all users to use it. With the GUI, perform the following steps:
The same effect can be achieved from the command line, e.g.:
sharity login -s smb://serverSee "sharity man login" and "sharity man keychain" for details.
sharity keychain publish smb://server
sharity debug file logLevelsDebugin a shell window. If we have asked you to use a different debug setting, please use that instead.
sharity debug syslog
/usr/local/sharity3/sbin/sharity.init startThen try to unmount with the system's umount or unmount again. When you eventually managed to get rid of all Sharity mounts, simply kill the daemon. [You should never ever kill sharityd, except in this particular situation!] Then start it again and the service should be restored.
Unmounting may fail with a "Device or resource busy" error message. This means that an application is still using a mount. The umount will not succeed before you have killed that application. To find out which application is busy on the mount please use the "lsof" or "fuser" utility. The source code to "lsof" is freely availabe.
/usr/local/sharity3/sbin/sharity.init testshellThis will put you into an "sh" type shell. You can start your favorite shell from there.
Before we actually start with sharity-userd, make sure that you have a valid Kerberos ticket. Type "klist" to show your Kerberos tickets and use "kinit" to login if required. Assuming that you have a valid Ticket Granting Ticket, you can do
sbin/sharity-userd getUserPrincipalto display your Kerberos principal name. To acquire credentials for a particular server, do
sbin/sharity-userd getKrb5Auth <server-principal>where "<server-principal>" is the Kerberos principal for the server. This name is usually constructed from the server name as "servername$@REALM" where the realm is usually the uppercase version of the domain name. For example:
bash$ sbin/sharity-userd getKrb5Auth 'pdc1$@TEST.HOME'If you succeed with these steps, a Kerberos login should work. If it does not, please make sure that you use the default credentials cache (environment variable KRB5CCNAME not set). Since Sharity is started at boot time, it cannot inherit your environment settings.
authenticator for pdc1$@TEST.HOME is:
odalloc/alloc: 0000: 6e 82 04 5a 30 82 04 56 a0 03 02 01 05 a1 03 02
odalloc/alloc: 0010: 01 0e a2 07 03 05 00 00 00 00 00 a3 82 03 99 61
[...]
odalloc/alloc: 0450: 36 84 00 8c 0c 7d f3 e9 58 7e 2b bd 98 e9
session key is:
odalloc/alloc: 0000: 09 35 a9 f4 4a 97 ed 60 42 11 ca d7 95 f7 e3 aa
To test access to Active Directory, try
sbin/sharity-userd ldapQuery <domain> 1 objectClass=userwhere "<domain>" is replaced with your Active Directory domain. For example:
bash$ sbin/sharity-userd ldapQuery test.home 1 objectClass=user
userd/db0: trying ldap connect to pdc1.test.home port 3268
userd/db0: SASL Interaction: challenge=Authorization Name prompt=...
userd/db0: SASL Interaction: defaultRes=
entry 0 dn = CN=TsInternetUser,CN=Users,DC=sub1,DC=test,DC=home
    cn = TsInternetUser
    displayName = TsInternetUser
    instanceType = 0
    distinguishedName = CN=TsInternetUser,CN=Users,DC=sub1,DC=test,DC=home
    objectCategory = CN=Person,CN=Schema,CN=Configuration,DC=test,DC=home
    objectClass = top
         person
         organizationalPerson
         user
[...]
If this command succeeds, too, you should be able to browse Active Directory through Sharity. If one of the commands fails, the error message should give you a hint to the cause of the problem.
In order to bind a Unix computer into the Windows domain, the following problems must be solved:
In the rest of this chapter, we will discuss two approaches. The first approach is Centrify's DirectControl, a commercial solution for Unix to Windows domain integration. In the second approach, we don't suggest particular solutions, but explain Sharity's interfaces to third party software.
Unix computers can't mount the user's home as "Z:" network drive. They must mount it at a particular path in the file system. Furthermore, Unix is built to serve multiple users at once, so the mount point must be individual to each user. It is common practice to name home directories after the user's login name, e.g. /home/james.
Sharity must have control over the home directories folder because it needs to mount there when the user logs in. We achieve this by mounting a special file system on the home directories folder. When a user logs in and the home directory is first accessed, the network path configured in Active Directory is mounted and a symbolic link to this location is created in the home directories folder.
/nethome/$domain/$userWe recommend that you add all your users to your DirectControl zones to allow SID to UID/GID mapping for them.
/nethome/$user
/home/net/$user
LD_LIBRARY_PATH=/usr/share/centrifydc/kerberos/lib:$LD_LIBRARY_PATHThen you must ensure that the users' home directory is mounted by Sharity. We offer the "x-homes:" file system to make this step easy. Make sure that the "x-homes:" file system is mounted on the network homes folder. This is best done in the file /usr/local/sharity3/var/fstab. If your zone template for the user home is /nethome/$user, add the line
LD_LIBRARY_PATH=/usr/share/centrifydc/lib:$LD_LIBRARY_PATH
export LD_LIBRARY_PATH
x-homes:company.com /nethometo this file. The x-homes: file system works only if a CIFS browse file system is mounted (typically at /CIFS, but the path can be customized during installation). The directory /nethome must be created manually with mkdir.
This configuration allows you to log in and have the home directory mounted automatically, e.g.:
login: jamesYou may want to optimize some configuration parameters now. Although these parameters can be found in /usr/local/sharity3/etc/config/*.cfg, you should not edit them in these files because they are overwritten with the next upgrade. Permanent configuration changes should go into /usr/local/sharity3/var/local.cfg. Here is an example for this file:
Password:
Last login: Fri Nov 3 15:21:29 on tty1
-bash-3.1$ pwd
/nethome/james
-bash-3.1$ ls -l /nethome
lrwxrwxrwx 1 james domainusers 1024 Nov 6 18:12 james -> /CIFS/homes[server.mycompany.com]/james
    main = {
        autoUnmountTimeout = 7200000;   // in ms
    };
    cifs = {
        homesLocalHomeDir = "/home/$user";
    };
autoUnmountTimeout: If an automatically mounted directory has not been used for this amount of time, it is unmounted. Since a mount is expensive in terms of system resources, we recommend to configure a non-zero value. An automatic unmount does not cause errors since the directory will be automatically mounted again when accessed.
homesLocalHomeDir: When the user logs in, Sharity obtains the user's home from Active Directory. If no network path is configured, Sharity must provide a local home directory. The variables $user and $domain will be replaced with the user's home directory and domain respectively.
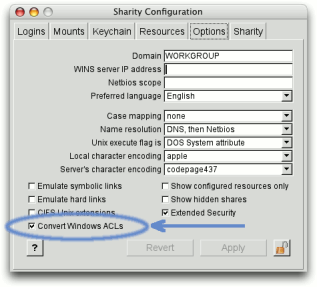
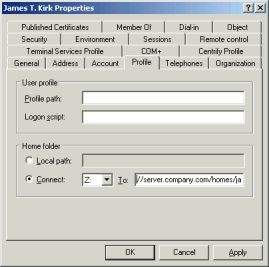
If you choose "Convert Windows ACLs" in Sharity's Options (see image on the right), Sharity obtains the Security Descriptor and thus Access Control List for each file and convert it to Unix file attributes. Files attributes reflect real owners and groups and the permission flags indicate the access permissions for the owner, group and the special Windows group "Everyone". Please note that obtaining the security descriptor for each file requires additional requests to the server and thus a performance penalty.
Authenticating with Kerberos. If Kerberos is already configured, Sharity should simply use it without further configuration. However, some installations and setups use a non-standard file name for the credentials cache. In order to accommodate these installations, Sharity can search for the credentials cache. Open the file /usr/local/sharity3/etc/config/cifs.cfg in an editor and search for krb5credCacheTemplate. This option is a shell-style matching pattern. Sharity searches all files matching the pattern and uses the first one which is owned by the current user. If you need to permanently change this setting, consider copying it to the file /usr/local/sharity3/var/local.cfg. See the example given in the previous section.
Authenticating with Password. If you don't want to use Kerberos, you must get hold of the user's password and feed it to the command sharity login, optionally saving it in the keychain as default password. The main problem here is to find a hook where the password can be obtained. If your system uses PAM for authentication, google for pam_extern and pam_script. Both modules can help you to intercept the login procedure.
If you activate "Convert Windows ACLs" in the Options section of the GUI, you must provide the mapping in a separate text file at /usr/local/sharity3/var/idmap.cfg. See the prototype of this file for a description of the file format. When you update this file, you must tell Sharity to re-read it. This can either be done by sending the process sharityd a HUP signal or with the command sharity reload.
sharity mount x-homes:company.com /nethomeThe domain name is used to look up the user in the appropriate domain. If your users are from multiple domains, one more directory level must be added. Home directories are then created as /nethome/$domain/$user. You tell the x-homes: file system that you want a two level hierarchy by omitting the domain parameter:
sharity mount x-homes: /nethomeAlternatively, if you have only a couple of users, you may want to avoid the "x-homes:" file system and create the symbolic links yourself. Assuming that the user homes are available at the network path \\server\homes\james, \\server\homes\susie, create the following symbolic links in the homes folder:
/home/james -> /CIFS/homes[server]/james
/home/susie -> /CIFS/homes[server]/susie
...
IMPORTANT: THIS END USER LICENSE AGREEMENT ("EULA") IS A LEGAL AGREEMENT BETWEEN YOU AND OBJECTIVE DEVELOPMENT. READ IT CAREFULLY BEFORE USING THE SOFTWARE. IT PROVIDES A LICENSE TO USE THE SOFTWARE AND CONTAINS WARRANTY INFORMATION AND LIABILITY DISCLAIMERS. BY INSTALLING, COPYING, OR OTHERWISE USING THE SOFTWARE, YOU AGREE TO BE BOUND BY THE TERMS OF THIS AGREEMENT. IF YOU DO NOT AGREE TO THE TERMS OF THIS AGREEMENT, DO NOT INSTALL OR USE THE SOFTWARE.
1.2 "SOFTWARE" means the software program(s) and associated software components supplied by OBJECTIVE DEVELOPMENT herewith, and corresponding documentation, associated media, printed materials, and online or electronic documentation.
1.3 "LICENSE KEY" is a character string representing a license grant in condensed form. A LICENSE KEY contains information about, but not limited to:
2.2 Network Installation. You may also install a copy of the SOFTWARE on a network server, used to RUN the SOFTWARE on your other computers over an internal network. However, you must acquire and dedicate licenses for each separate computer on which the SOFTWARE is RUN from the server.
3.2 Home User License. The Home User License is restricted to private, non-commercial use.
3.3 Business License. The Business License allows you to RUN the SOFTWARE in a commercial environment.
3.4 Demo License. The Demo License allows you to RUN the SOFTWARE in a commercial, non-private environment for test and evaluation pruposes. Demo Licenses are valid for a period of one month, unless the LICENSE KEY encodes a different expiration date.
4.2 Secrecy. As the owner of a LICENSE KEY you are responsible for keeping this key secret. If any third party gets access to your LICENSE KEY due to willful or negligent act, you are liable for the damage that arises to OBJECTIVE DEVELOPMENT.
4.3 Reproduction. Except for backup and installation purposes the SOFTWARE must not be reproduced on any type of media (including, but not limited to, CD-ROM, DVD or internet download) without the formal approval from OBJECTIVE DEVELOPMENT.
4.4 Prohibition on Reverse Engineering, Decompilation, and Disassembly. You may not reverse engineer, decompile, or disassemble the SOFTWARE, except and only to the extent that such activity is expressly permitted by applicable law notwithstanding this limitation.
4.5 Not for Resale Software. If the SOFTWARE or the LICENSE KEY is labeled "Not for Resale" or "NFR", then you may not sell it or otherwise transfer it for value.
4.6 Rental. You may not rent, lease, or lend the SOFTWARE or otherwise encumber any copy of the SOFTWARE, or any of the rights granted herein.
4.7 Transfer. You may not transfer your rights under this EULA to another end user without OBJECTIVE DEVELOPMENT's prior written consent. If such consent is obtained, you may permanently transfer this License to another end user provided you transfer the entire SOFTWARE and the LICENSE KEY to such end user, and you do not retain any copies. The recipient of such transfer must agree to all terms and conditions of this EULA.
4.8 Reservation of Rights. OBJECTIVE DEVELOPMENT retains all rights not expressly granted.
4.9 Non-Exclusive Rights. Your license rights under this EULA are non-exclusive.
6.2 Survival of Terms. All provisions regarding secrecy, confidentiality and limitation of liability shall survive termination of this agreement.
LIMITATION OF LIABILITY. TO THE MAXIMUM EXTENT PERMITTED BY APPLICABLE LAW, IN NO EVENT SHALL OBJECTIVE DEVELOPMENT OR ITS SUPPLIERS BE LIABLE FOR ANY SPECIAL, INCIDENTAL, INDIRECT, OR CONSEQUENTIAL DAMAGES WHATSOEVER (INCLUDING, WITHOUT LIMITATION, DAMAGES FOR LOSS OF BUSINESS PROFITS, BUSINESS INTERRUPTION, LOSS OF BUSINESS INFORMATION, OR ANY OTHER PECUNIARY LOSS) ARISING OUT OF THE USE OF OR INABILITY TO USE THE SOFTWARE OR THE PROVISION OF OR FAILURE TO PROVIDE SUPPORT SERVICES, EVEN IF OBJECTIVE DEVELOPMENT HAS BEEN ADVISED OF THE POSSIBILITY OF SUCH DAMAGES. IN ANY CASE, OBJECTIVE DEVELOPMENT'S ENTIRE LIABILITY UNDER ANY PROVISION OF THIS EULA SHALL BE LIMITED TO THE AMOUNT ACTUALLY PAID BY YOU FOR THE SOFTWARE.
8.2 Applicable Law. This agreement is governed by the laws of the Republic of Austria.
8.3 Responsible Courts. The responsible courts in Vienna/Austria will have exclusive jurisdiction regarding all disputes in connection with this agreement.